Thursday, February 7, 2013

Sand Dollars and Seashells (beach play in a Midwest Winter)

 I know it has been forever since I last made a post! I hope to be able to try and keep up, but sometimes I get caught up in other things, and forget to take pictures of activities, or to post about them! Nebraska has been blessed with a fairly mild winter(only two big snows so far, and a few other days of flurries, but mostly temps in the mid to upper 40's, and sometimes in the 50's). Even so, I find the boys and I suffering from Cabin Fever.
 Over Christmas, I had the pleasure of flying to Virginia, and spending 10 days with my sister and her Kiddos. When I asked Conrad what he wanted me to bring back for him, He said Seashells. Since my sister lives near Virginia beach, I made her take me there, and we perused the shops(a lot of which were closed due to it being off season.) One shop we stopped at had some fun Shells, and Sand dollars, and even a bin full of tiny shells to fill bags with. I brought home several different shells, and two little bags full of baby shells.

When I got back to work, and let Conrad open his carefully wrapped sand dollar, the first thing he asked was "Can I paint it?" Why not? I thought. It is after all white...and it would be a great way for him to explore the sand dollar. It turns out, a Sand dollar is the perfect canvas for watercolor paints! (side note, Watercolors have always been one of my favorite ways to create). I painted the boys' names on their sand dollars, and then set the paints out, and let the boys create and explore! The following pictures are what came of this activity!


Conrad was full of questions as he painted. He asked about the holes on the Sand dollar. He looked at the other side of the sand dollar, and then held it up to the light to notice the tiny holes on top. This project was not only an art project (and one that is displayed nicely in each of the boys' rooms), but it was also a fun science project, causing Conrad to ask questions, and explore a little more into something we don't have in Nebraska.
While we are on the subject of Living in Nebraska, Obviously there are no Oceans, and No true beaches (Lake beaches just aren't the same as ocean beaches, Just saying), So the idea of seashells for Conrad was exciting. I decided to dump them into a sensory bin, and see where that took him. The following pictures are the results of his explorations.


Conrad first decided to sort the shells into big and little. Next he tried to decide what kind of animals lived in each of the bigger shells. After he had finished that, he organized the little ones by colors. Finally, he just took time to explore and play with them. He put some up to his ears to "hear the ocean". He filled the bigger shells with little shells. He gave the shells names, and then told me the tiny shells were babies, and the big shells were their moms and dads. It was quite enjoyable to watch him learn, play and explore something that some of us have seen many times. Something as simple as a shell can be so unique, and beautiful, and makes a great learning toy! :)


The next day, while Conrad was working on another project, I decided to let Reece explore the shells, and see what he did with them. The following photos are the results of his exploration! :)

 The first thing Reece did, was hold one of the shells to his ear. He then proceeded to hold each one to his ear, with a big smile on his face. He also handed them to me, and tried to put them to my ears to listen.


Next, He smelled the different shells. He also tried to lick several of them(you could see some of the salt on them, even though they had been cleaned, and I am sure he could taste it). Finally he started to tap different shells together to make different sounds. He really enjoyed exploring the shells, and just as with his brother, I got joy out of watching him explore the shells. Seeing something through a child's eye can be a totally new experience.

Tuesday, October 30, 2012

Pumpkin Week

Last week, our theme was pumpkins. Conrad had a blast doing our activities, and I had a lot of fun as well (It was my first time carving a pumpkin by myself) The following activities are just two of the activities we enjoyed this week.

Two Ingredient Pumpkin Cookies

For this Activity, you will need the following things:

  • one box of spice cake mix
  • one can of Pumpkin
  • a mixing bowl
  • a mixing spoon
  • a cookie sheet
  • parchment or waxed paper
  • cooking spray
These cookies are super easy to make, and really yummy!

First, preheat the oven to 350 degrees
Next place the parchment paper on the cookie sheet, and spray with cooking spray.
Now you are ready to make the cookie "dough"


Dump the Spice cake mix into the mixing bowl, and then add the pumpkin.


Next mix the two things together.


Until it looks something like this:


Now, drop the batter by the tablespoon onto the prepared cookie sheet. (about 1-2 inches apart)


Bake at 350 for about 12-15 minutes depending on your oven, until the edges start to brown a bit. Take out of the oven to cool on pan for about five minutes, before transferring to a cooling rack to finish cooling. This recipe should make about three dozen small cookies. They are great with some cream cheese frosting, but are also great alone. They will be soft like a muffin, so don't expect a hard cookie.

We HEART these cookies! :)


I should warn you, these cookies are very addicting! :) We made these on Tuesday of last week, and they were pretty much gone by thursday! :) 

One of our other pumpkin projects was pumpkin painting. The Following pictures are of our adventures in doing this. (note, I used some glow in the dark finger paint that I got as a gag gift several years ago, it didn't dry properly, but does glow nicely.)


Tomorrow, we are having our Halloween party. I invited my cousin and her daughters to join us. I will be sure to take a lot of pictures, and write another post later this week with pictures from our party, and a few more Pumpkin activities! :)

Friday, October 19, 2012

Indoor Fall Fun, and Melted Crayon Rocks

This week's theme is Fall Leaves, and on Wednesday, we were supposed to go outside to rake leaves and crunch in them. Unfortunately for us, it was raining. Instead, I went to the porch and found a small pile of dry leaves, and put them into a tub for Conrad. I also put Reece into his high chair, and gave him some to play with. The Following are the Pictures I took from the leaf play! :)
Our bucket of Dry Leaves

Conrad decided to play in them with his shovel. He also buried  some action figures in them.

Reece had a blast. Conrad decided to give him a shovel as well.

I had to add this one. Reece was very proud of the leaf on his head! :) Silly Reece!


Melted Crayon Rocks


When I found this project on  this website, I knew instantly I was going to try this with Conrad! :)  Since it was raining again today, our plans for crushed leaf art got spoiled. Here was my chance to try out this project.

To make these beautiful works of art, you will need the following items:
  • Old crayons with the wrappers removed (or new crayons, longer crayons work better for the kids)
  • rocks of all shapes and sizes ( works better with rocks that will fit in the palm of your hand)
  • Aluminum Foil
  • A Towel
  • A cookie Sheet
  • An Oven
Preheat the oven to 350 degrees. Cover the Cookie Sheet with aluminum foil. Wash the rocks and lay them out to dry.


Once the rocks are dry, lay them out on the Cookie Sheet, and put them in the heated oven for about ten minutes.


To prepare your work space,  lay the towel out on your table and  place a layer of aluminum foil over it.
Now, you are ready to have some fun.  Using an oven mitt, grab a hot rock or two from the cookie sheet, and set them on your work space. Place the cookie sheet with the rest of the rocks back in the oven so they stay hot.


Take a crayon, and "color" on the tops and sides of the rocks. If you are doing this project with a child, make sure they know how hot the rocks will be, and have an ice pack on hand for just in case. This picture shows Conrad creating one of his rocks.


Let the Child experiment with color mixing, and designing whatever they want. Here Conrad is letting the white crayon melt over the top of his already colored red/orange rock. when you finish one rock, pull another one out of the oven, and start again! :)


Here you can see our finished products as they are drying. As you can see, we decorated some rocks with patterns, and other rocks, we just let the crayons melt their own path. These Rocks can be used for any number of things, including: decoration, game pieces, and gifts. Use your imagination, and enjoy! :)

Friday, October 12, 2012

New Post soon

Wow, I realize it has been quite awhile since I last posted here! Hopefully Next week I will start posting stuff again! We took a break for the summer, and Conrad had a lot of time to do what he wanted to do, with a few repeat projects! We started our new schedule last week, and I am confident enough that by next week, I will be ready to post pictures and projects again! :) Thank you for those of you who follow me, and keep checking for updates! :)

Wednesday, August 29, 2012

Baked Cotton Balls, and A Rainbow Rain Storm!

Hello to all my followers! I know it has been quite awhile since I posted last, so I decided it was about time for me to post something new! Today's projects are both activities that we did quite awhile back, since the summer has mostly been about Conrad wanting his free time, or doing repeat activities.


Baked Cotton Balls

For this project, you will need the following items :

  • 2 cups Flour
  • 2 cups Water
  • Food Coloring
  • Cotton Balls
  • Small paint cups or containers
  • Baking Pan /Cookie Sheet
  • Cooking Spray
  • Hammer
Note: if you don't like messy projects, this one is not for you! :)

Set the Oven to 300 degrees. Spray the baking pan with the cooking spray,
To start, you need to make a mixture similar to glue using the flour and water. Pour the Water over the flour, and mix them together. Once you have finished, divide the mixture into the small cups(one for each color you choose). Put three or four drops of food coloring into each cup and mix them up. Now you are ready for the fun! :)


Dip the cotton balls in the mixture, and coat them completely one by one. Once they are coated, place them on the  pan.


The following are some pictures of the process of dipping the cotton balls and placing them on the pan.


Once all the cotton balls are dipped and placed on the pan, you need to put them in the oven, and bake them for 45 minutes to an hour.


When they are finished baking, they should look something like this:


Once they have cooled, then you can choose to leave them as they are as a piece of artwork, or you may continue on to the next step.


Place the finished product into a tub or some sort, or take them outside to the sidewalk. Give the child a hammer ( as you can see, I used a wooden hammer from Conrad's toy tool set)


Now, let the child use their imagination to do what they choose with them. Conrad first decided to try and rip them apart/ break them up.


Here is is showing me that he was able to pull one of the cotton balls out of the hard shell it was in! :)


Here he is hammering the cotton balls to break them apart. He had a blast ripping and hammering, and breaking the shells.


Rainbow Rain Storm

For this activity, you need the following items:

  • a large jar
  • water
  • dish soap
  • Food coloring


This is a fun project that is also a science experiment. It helps to show a little bit how a rain cloud works, and it is very pretty (if you like rainbows and mixing colors like I do)

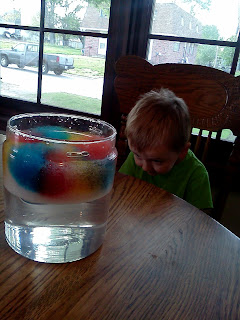
The first step is to slowly fill the jar with warm water. while you are doing this, add a few drops of the dish soap into the jar. Once there is a good layer of suds on top of the water, you have filled the jar full enough. Now you are ready to begin the experiment!


Drop a few drops of food coloring in various places over the top of the suds, as seen here. I dropped three to four drops to create each separate color spot here, being sure to mix a few of them together.


And now, the watching and waiting begins...


Soon, you will begin to see the colors leaking through the Suds and mixing into the water.


The More you watch, the more the colors will mix and swirl, creating a lovely mixture of color in the suds, and making a beautiful rainbow underneath.


For this Activity, the suds represent the clouds, and the food coloring represents the moisture in the air that evaporates . Underneath the "clouds" is the color, which then represents the rainstorm in the air! :)

Conrad loved this project so much, we emptied out the jar, and did the project again so he could watch! :)

Monday, July 23, 2012

Painted Leaves and some Squishy Baff

Last week, we were playing outside, and Conrad kept bringing giant leaves to me from a tree in the back yard. I decided why not create something with them.  We decided to paint them, and it resulted in a simple and fun art project! :)

Painted Leaves


For this project, you will need the following items:
  • Paint
  • Paintbrushes
  • Leaves 


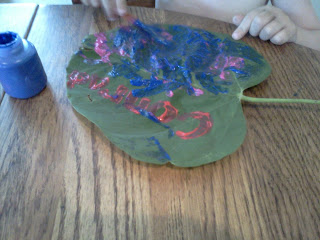
As you can see, our leaves were quite large, but it would work with any type or size of leaf. I put the leaf out in front of Conrad with his name painted on it in his favorite color. I also put out the paint and paint brushes. The next two pictures are the results of his creativity! :)

Of course, I wanted to paint a leaf as well! The leaves we used, had one smooth side, and one"Fuzzy" Side, as Conrad called it. I decided to see what would happen if I painted the fuzzy side! :)
I decided to make a rainbow on mine, and I was pleased with the final results.


Squishy Baff


A friend of mine recently discovered this great stuff meant for Bathtub fun, and I was curious, so I bought some! :) He found his at Wal-mart, But I found mine at Target in the toy section, near the playdough.
I decided to use just a little bit, and put it into a sensory tub, for more fun with sensory play, and that worked out just fine.


The Package came with two packets of powder(enough for two baths) and two packets of dissolving powder for simple clean up. the picture to the right shows what the powder looks like.


I dumped in about a tablespoon or two worth of the powder into our sensory tub full of water, and mixed it together. This is what it looked like after about a minute of sitting in the water. Originally, Conrad didn't want to play with it, so I started to play with it so it wouldn't go to waste. I'm not gonna lie, It was fun, and I was giggling so much, that Conrad finally decided he wanted to play as well! :)


The next couple of pictures are what he spent doing for the next hour and a half after he decided he liked to play with the squishy goo.
The mixture almost became solid, it was thick enough to set things on top of it!

"It feels squishy Stephanie! Look at this!"

"I made a squishy drum!" :)

"Stephanie, My hand is buried in the squishy garden pot!"


I also decided to let Reece get in on the fun, since Squishy Baff is not toxic (although it does say not to eat it on the package, and it does taste terrible). The following pictures are of his exploration of the squishy fun!
"I'm not sure about this stuff!"


this is Fun!


Really fun! :)

As I said before, there is another powder that comes with the package to help dissolve the gel when you are finished, just sprinkle a little bit of it on the mess in your bathtub or sink, and simply rinse down the drain! :)

Turned out to be a great sensory activity for  all three of us, and it wasn't very messy at all! :)